사내에서 istio 프록시로 구성하여 사용중인데, 뭐랄까. 제대로 못쓰고 있는듯하다. 굳이 istio를 붙인것같은.. 제대로 못쓸꺼면 아에 빼버리던가(네트워크 문제시 파악 구간이 더 많아져서 싫다.) 아니면 제대로 쓸 수 있는 실력이 필요했다. 예를들어, 서비스 장애가 발생할 경우 istio가 없었다면 단순히 네트워크 구간만 살펴보면 됐다. 그런데 현재는 istio 구간까지 추가로 살펴봐야 한다. 문제는 해당 구간에 대한 모니터링이 안되고 있는 상황. 그래서 명확히 이 구간은 문제가 없다라고 판단하기가 어렵다. 이를 해결하려면 istio에 빠삭히 알아야 할 것 같았다. 그래서 작년에 istio 시험을 사두기만 했다. 그렇게 시간을 보내다 때마침 가시다님께서 istio 스터디를 진행하신다기에 재빨리 신청했다. (과거 여러 스터디를 운영하셨던 분들을 포함한 가시다님, 김원일님, 김석필님 감사합니다.)
스터디를 끝낼 때 istio 운영을 유지하며 시스템을 더욱 고도화(모니터링 추가등)할 지, 아니면 istio를 걷어낼지를 판단 할 수 있는 실력이 쌓였으면 좋겠다.
현재 사내에 istio를 사용중이다. 따라서 실습하면서 실제 운영환경과 비교하고 다른점이 있다면 어떤 설정에 의해 왜 다른지도 다뤄보고자 한다.
그럼 1주차 시작
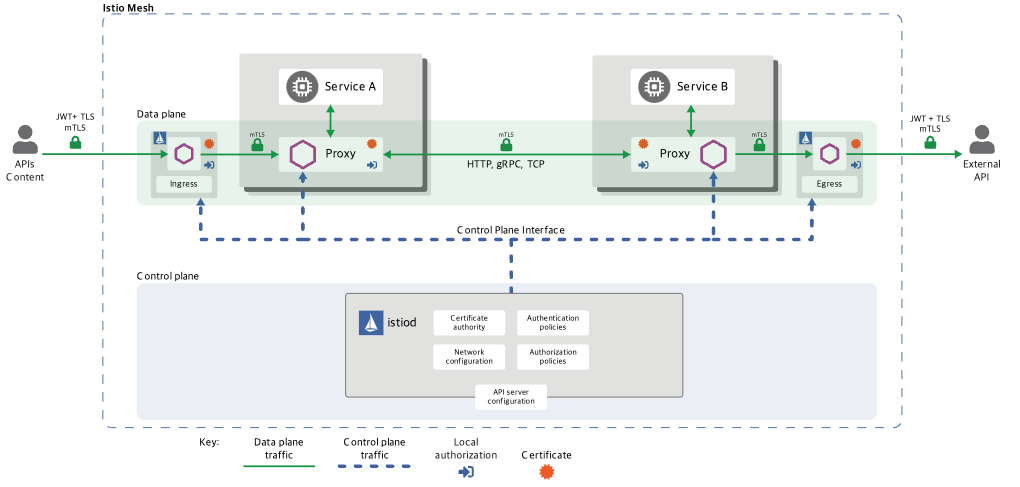
Istio에 대한 간략한 설명
Istio를 왜 사용해야 하는가 ? Istio를 사용하지 않을 경우 발생할 수 있는 문제.
서비스 간 통신의 복잡성 증가:
네트워크 장애, 과부하, 버그 등으로 인해 서비스 간 요청이 실패하거나 성능 저하가 발생할 수 있음.
예를 들어, 다운스트림 서비스가 느리거나 장애가 발생하면 연쇄적인 서비스 장애로 이어질 가능성이 큼.
복원력 패턴 구현의 어려움:
타임아웃, 재시도, 서킷 브레이커 등의 복원력 패턴을 각 애플리케이션에서 직접 구현해야 함.
여러 언어와 프레임워크를 사용하는 환경에서는 이러한 패턴을 일관되게 구현하기 어려움.
운영 및 유지보수 부담 증가:
라이브러리 의존성을 관리하고 각 애플리케이션에 맞게 코드를 수정해야 하며, 이는 시간이 많이 소요되고 오류 가능성을 높임.
새로운 언어나 프레임워크 도입 시 추가적인 구현 작업이 필요함.
관찰 가능성 부족:
서비스 간 트래픽, 요청 실패율, 성능 병목 등을 실시간으로 파악하기 어려움.
장애 원인을 추적하거나 시스템 상태를 모니터링하는 데 한계가 있음.
Istio를 사용하면 해결되는 점
서비스 간 통신의 표준화:
Istio는 Envoy 프록시를 통해 서비스 간 통신을 관리하며, 재시도, 타임아웃, 서킷 브레이커 등의 기능을 애플리케이션 외부에서 제공.
이를 통해 서비스 간 통신의 안정성과 복원력을 높일 수 있음.
언어 및 프레임워크 독립성:
애플리케이션 코드 수정 없이 네트워크 관련 기능을 제공하므로 언어나 프레임워크에 구애받지 않음.
다양한 기술 스택에서도 일관된 네트워킹 정책 적용 가능.
운영 부담 감소:
Istio가 네트워킹 및 보안 정책을 중앙에서 관리하므로 각 애플리케이션에서 이를 구현할 필요가 없음.
새로운 서비스 추가나 변경 시에도 운영 부담이 줄어듦.
강화된 관찰 가능성:
Istio는 메트릭, 로그, 분산 트레이싱을 통해 실시간으로 시스템 상태를 모니터링 가능.
장애 원인 분석 및 성능 최적화 작업이 용이해짐.
결론
Istio는 네트워킹 관련 문제를 애플리케이션에서 인프라로 전가(내가 생각하는 devops 엔지니어는, 개발자는 회사의 이익에 필요한 개발만 할 수 있도록 환경을 만들어주는거라 생각하는데.. 이 모토랑 일치하는듯)하여 운영 효율성을 높이고, 복잡한 클라우드 환경에서도 안정적으로 서비스를 운영할 수 있도록 돕습니다.
Istio란? 서비스메시란 ? 엔보이프록시? 사이드카?
서비스 메시 (Service Mesh)
서비스 메시란, 여러 서비스가 서로 대화할 때 그 대화를 도와주는 네트워크의 "통신 감독관" 같은 역할을 합니다.
예를 들어, 학교에서 선생님이 학생들끼리 조용히 대화하도록 도와주는 것과 비슷합니다.
엔보이 프록시 (Envoy Proxy)
엔보이 프록시는 서비스들 사이에서 주고받는 메시지를 대신 전달하는 "우체부" 역할을 합니다.
예를 들어, 친구에게 편지를 보낼 때 우체부가 대신 전달해 주는 것처럼, 엔보이는 서비스 간 데이터를 안전하고 빠르게 전달합니다.
사이드카 (Sidecar)

사이드카는 주 컨테이너(주요 프로그램)를 도와주는 "조수" 컨테이너입니다.
예를 들어, 오토바이에 붙어 있는 작은 캐빈처럼, 사이드카는 옆에서 필요한 일을 돕습니다. Istio에서는 이 사이드카가 엔보이 프록시로 동작합니다.
Istio 프록시
Istio 프록시는 엔보이 프록시를 사용하여 각 서비스 옆에 사이드카로 배치됩니다.
예를 들어, 학교에서 각 반마다 선생님(프록시)이 배치되어 학생들(서비스)이 서로 잘 소통하도록 돕는 것과 같습니다. 이 프록시는 메시지를 가로채고, 어디로 보내야 할지 알려주며, 보안도 책임집니다.
연관 관계
- 서비스 메시 안에는 여러 서비스가 있고, 이들이 서로 대화할 때 엔보이 프록시가 중간에서 도와줍니다.
- 엔보이 프록시는 각 서비스 옆에 사이드카 형태로 배치되어 Istio라는 시스템의 일부로 작동합니다.
- Istio는 전체 네트워크를 관리하며 트래픽을 안전하고 효율적으로 제어합니다.
즉 정리하자면, Istio를 사용하지 않는다면 애플리케이션 레벨에서의 리소스가 많이 사용되는데, Istio를 사용하면 효율적으로 인프라 레벨로 옮길 수 있다. 어떻게? 사이드카 프록시로.
Istio의 단점은 ?
디버깅 복잡성 증가
Envoy 프록시가 추가되면서 네트워크 요청 경로가 복잡해지고, 프록시에 익숙하지 않은 경우 디버깅이 어려워질 수 있음.
테넌시 관리의 어려움
서비스 메시 구성 시 적절한 정책과 자동화가 없으면 잘못된 설정으로 인해 다수의 서비스에 영향을 미칠 가능성이 있음.
운영 복잡성 증가
서비스 메시 도입으로 새로운 레이어가 추가되어 시스템 아키텍처와 운영 절차가 복잡해질 수 있음.
조직의 기존 거버넌스 및 팀 간 협업과의 통합이 어려울 수 있음.
실습 진행
istio 설치
$ istioctl version --remote=false
$ kubectl get all,svc,ep,sa,cm,secret,pdb -n istio-system
NAME                                       READY   STATUS    RESTARTS   AGE
pod/grafana-b854c6c8-rhsvm                 1/1     Running   0          19h
pod/istio-ingressgateway-996bc6bb6-lwqq5   1/1     Running   0          19h
pod/istiod-7df6ffc78d-r4jvv                1/1     Running   0          19h
pod/jaeger-5556cd8fcf-8z2zz                1/1     Running   0          19h
pod/kiali-648847c8c4-wcw8l                 1/1     Running   0          19h
pod/prometheus-7b8b9dd44c-zzsr8            2/2     Running   0          19h

NAME                           TYPE           CLUSTER-IP     EXTERNAL-IP   PORT(S)                                      AGE
service/grafana                ClusterIP      10.200.1.30    <none>        3000/TCP                                     19h
service/istio-ingressgateway   LoadBalancer   10.200.1.103   <pending>     15021:31155/TCP,80:30491/TCP,443:30079/TCP   19h
service/istiod                 ClusterIP      10.200.1.116   <none>        15010/TCP,15012/TCP,443/TCP,15014/TCP        19h
service/jaeger-collector       ClusterIP      10.200.1.31    <none>        14268/TCP,14250/TCP,9411/TCP                 19h
service/kiali                  ClusterIP      10.200.1.99    <none>        20001/TCP,9090/TCP                           19h
service/prometheus             ClusterIP      10.200.1.130   <none>        9090/TCP                                     19h
service/tracing                ClusterIP      10.200.1.38    <none>        80/TCP,16685/TCP                             19h
service/zipkin                 ClusterIP      10.200.1.200   <none>        9411/TCP                                     19h

NAME                                   READY   UP-TO-DATE   AVAILABLE   AGE
deployment.apps/grafana                1/1     1            1           19h
deployment.apps/istio-ingressgateway   1/1     1            1           19h
deployment.apps/istiod                 1/1     1            1           19h
deployment.apps/jaeger                 1/1     1            1           19h
deployment.apps/kiali                  1/1     1            1           19h
deployment.apps/prometheus             1/1     1            1           19h

NAME                                             DESIRED   CURRENT   READY   AGE
replicaset.apps/grafana-b854c6c8                 1         1         1       19h
replicaset.apps/istio-ingressgateway-996bc6bb6   1         1         1       19h
replicaset.apps/istiod-7df6ffc78d                1         1         1       19h
replicaset.apps/jaeger-5556cd8fcf                1         1         1       19h
replicaset.apps/kiali-648847c8c4                 1         1         1       19h
replicaset.apps/prometheus-7b8b9dd44c            1         1         1       19h

NAME                                                       REFERENCE                         TARGETS   MINPODS   MAXPODS   REPLICAS   AGE
horizontalpodautoscaler.autoscaling/istio-ingressgateway   Deployment/istio-ingressgateway   8%/80%    1         5         1          19h
horizontalpodautoscaler.autoscaling/istiod                 Deployment/istiod                 0%/80%    1         5         1          19h

NAME                             ENDPOINTS                                                     AGE
endpoints/grafana                10.10.0.10:3000                                               19h
endpoints/istio-ingressgateway   10.10.0.8:15021,10.10.0.8:8080,10.10.0.8:8443                 19h
endpoints/istiod                 10.10.0.7:15012,10.10.0.7:15010,10.10.0.7:15017 + 1 more...   19h
endpoints/jaeger-collector       10.10.0.9:9411,10.10.0.9:14250,10.10.0.9:14268                19h
endpoints/kiali                  10.10.0.11:9090,10.10.0.11:20001                              19h
endpoints/prometheus             10.10.0.12:9090                                               19h
endpoints/tracing                10.10.0.9:16685,10.10.0.9:16686                               19h
endpoints/zipkin                 10.10.0.9:9411                                                19h

NAME                                                  SECRETS   AGE
serviceaccount/default                                1         19h
serviceaccount/grafana                                1         19h
serviceaccount/istio-ingressgateway-service-account   1         19h
serviceaccount/istio-reader-service-account           1         19h
serviceaccount/istiod                                 1         19h
serviceaccount/istiod-service-account                 1         19h
serviceaccount/kiali                                  1         19h
serviceaccount/prometheus                             1         19h

NAME                                            DATA   AGE
configmap/grafana                               4      19h
configmap/istio                                 2      19h
configmap/istio-ca-root-cert                    1      19h
configmap/istio-gateway-deployment-leader       0      19h
configmap/istio-gateway-status-leader           0      19h
configmap/istio-grafana-dashboards              2      19h
configmap/istio-leader                          0      19h
configmap/istio-namespace-controller-election   0      19h
configmap/istio-services-grafana-dashboards     4      19h
configmap/istio-sidecar-injector                2      19h
configmap/kiali                                 1      19h
configmap/kube-root-ca.crt                      1      19h
configmap/prometheus                            5      19h

NAME                                                      TYPE                                  DATA   AGE
secret/default-token-lmqrr                                kubernetes.io/service-account-token   3      19h
secret/grafana-token-74qt2                                kubernetes.io/service-account-token   3      19h
secret/istio-ca-secret                                    istio.io/ca-root                      5      19h
secret/istio-ingressgateway-service-account-token-tlq54   kubernetes.io/service-account-token   3      19h
secret/istio-reader-service-account-token-8zz99           kubernetes.io/service-account-token   3      19h
secret/istiod-service-account-token-zrr8b                 kubernetes.io/service-account-token   3      19h
secret/istiod-token-x64kr                                 kubernetes.io/service-account-token   3      19h
secret/kiali-token-84msl                                  kubernetes.io/service-account-token   3      19h
secret/prometheus-token-vqmbw                             kubernetes.io/service-account-token   3      19h

NAME                                              MIN AVAILABLE   MAX UNAVAILABLE   ALLOWED DISRUPTIONS   AGE
poddisruptionbudget.policy/istio-ingressgateway   1               N/A               0                     19h
poddisruptionbudget.policy/istiod                 1               N/A               0                     19h
이중 istio-ingressgateway 서비스 리소스의 경우 실제 운영환경은 다음과 같이 EXTERNAL-IP에 CSP의 LB 도메인이 들어가있다. 실습 환경에서는 PENDING이다.
$ k get svc -n istio-system
NAME                   TYPE           CLUSTER-IP       EXTERNAL-IP                                                                   PORT(S)                                      AGE
istio-ingressgateway   LoadBalancer   198.19.240.44    istio-syste-istio-ingres-xxx.kr-fin.lb.naverncp.com   15021:31396/TCP,80:30616/TCP,443:31295/TCP   527d
istiod                 ClusterIP      198.19.157.147   <none>                                                                        15010/TCP,15012/TCP,443/TCP,15014/TCP        527d
이는 CSP(NCP)에서 설치된 쿠버네티스 클러스터(NKS)에는 기본적으로 cloud controller manager의 service controller에 의해 자동으로 NKS의 LB를 생성한다. 관련 설정은 kube-system 네임스페이스에 ncloud-config라는 ConfigMap이 적용 돼 있다.
$ k get cm -n kube-system -o yaml ncloud-config
apiVersion: v1
data:
  acgNo: "11111"
  apiUrl: https://nks.apigw.fin-ntruss.com
  basePath: /ncloud-api/v1
  clusterId: "1111"
  lbPublicSubnetNo: "11111"
  lbSubnetNo: "11111"
  regionCode: FKR
  regionNo: "1"
  vpcNo: "1111"
  zoneNo: "111"
kind: ConfigMap
metadata:
  annotations:
    kubectl.kubernetes.io/last-applied-configuration: |
생략
  creationTimestamp: "2023-10-30T02:09:49Z"
  name: ncloud-config
  namespace: kube-system
  resourceVersion: "1111111"
  uid: 11111-1a71-457e-813c-4b2d13f00446
해당 설정에 의해 서비스타입이 로드밸런서인경우 NCP API와 상호작용하여, 자동으로 NCP의 LB(기본값은 프록시 로드밸런서)를 생성하게 된다.
참고로 로드밸런서 이름(익스터널IP에 들어가는 도메인명)의 생성 규칙은 다음과 같다.
<네임스페이스-서비스이름-포트번호-랜덤문자열>
파드배포(사이드카로 Istio 도 같이 배포)
이제 배포되는 모든 파드들에 사이드카로 istio가 같이 배포되도록 해야 한다. 이는 2가지 방법이 있는데,
docker exec -it myk8s-control-plane istioctl kube-inject -f /istiobook/services/catalog/kubernetes/catalog.yaml
으로 매니페스트에 사이드카 설정을 추가하는 방법과
kubectl label namespace istioinaction istio-injection=enabled
으로, 네임스페이스에 istio-injection=enabled Label에 설정 돼 있는 경우 해당 네임스페이스의 파드 스펙에 자동으로 사이드카 설정을 한다.
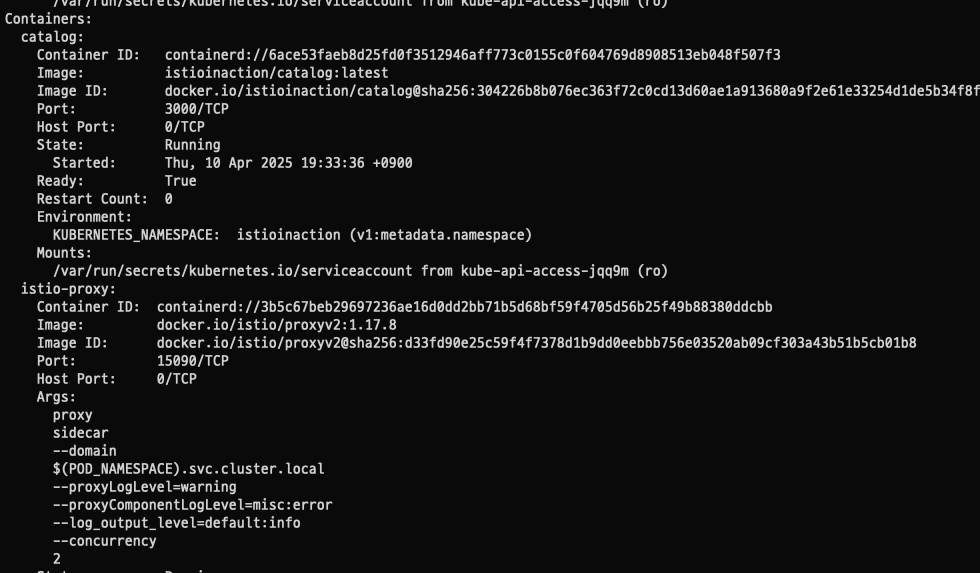
이제 파드를 배포하면 다음과 같이 앱이 배포된다.

하나의 파드에 두개의 컨테이너가 있음이 확인된다. 이를 describe로 확인해보면 보는것처럼 catalog라는 메인 컨테이너외에 istio-proxy라는 사이드카 컨테이너가 올라온것을 알 수 있다.
istio proxy 상태 확인
# istioctl proxy-status : 단축어 ps
docker exec -it myk8s-control-plane istioctl proxy-status
NAME                                                  CLUSTER        CDS        LDS        EDS        RDS        ECDS         ISTIOD                      VERSION
catalog-6cf4b97d-nccfj.istioinaction                  Kubernetes     SYNCED     SYNCED     SYNCED     SYNCED     NOT SENT     istiod-7df6ffc78d-bj7h7     1.17.8
istio-ingressgateway-996bc6bb6-mz544.istio-system     Kubernetes     SYNCED     SYNCED     SYNCED     SYNCED     NOT SENT     istiod-7df6ffc78d-bj7h7     1.17.8
webapp-7685bcb84-c55ck.istioinaction                  Kubernetes     SYNCED     SYNCED     SYNCED     SYNCED     NOT SENT     istiod-7df6ffc78d-bj7h7     1.17.8

ISTIOIGW=istio-ingressgateway-996bc6bb6-647tx.istio-system
WEBAPP=webapp-7685bcb84-nfntj.istioinaction

# istioctl proxy-config : 단축어 pc
docker exec -it myk8s-control-plane istioctl proxy-config all $ISTIOIGW
docker exec -it myk8s-control-plane istioctl proxy-config all $WEBAPP

docker exec -it myk8s-control-plane istioctl proxy-config listener $ISTIOIGW
docker exec -it myk8s-control-plane istioctl proxy-config route $ISTIOIGW
docker exec -it myk8s-control-plane istioctl proxy-config cluster $ISTIOIGW
docker exec -it myk8s-control-plane istioctl proxy-config endpoint $ISTIOIGW
docker exec -it myk8s-control-plane istioctl proxy-config log $ISTIOIGW

docker exec -it myk8s-control-plane istioctl proxy-config listener $WEBAPP
docker exec -it myk8s-control-plane istioctl proxy-config route $WEBAPP
docker exec -it myk8s-control-plane istioctl proxy-config cluster $WEBAPP
docker exec -it myk8s-control-plane istioctl proxy-config endpoint $WEBAPP
docker exec -it myk8s-control-plane istioctl proxy-config log $WEBAPP

# envoy 가 사용하고 있는 인증서 정보 확인
docker exec -it myk8s-control-plane istioctl proxy-config secret $ISTIOIGW
docker exec -it myk8s-control-plane istioctl proxy-config secret $WEBAPP
위 명령어들은 istio 서비스 매쉬 내 프록시의 상태를 확인(istioctl proxy-status)하고, 특정 프록시의 상세 구성 정보를 조회(istioctl proxy-config)하는 명령어다.
Istio 프록시(Envoy)의 네트워크 흐름에서 Listener, Route, Cluster, Endpoint는 트래픽 처리 단계에 따라 아래와 같은 순서로 작동합니다:

1. Listener
역할: Envoy가 수신하는 트래픽을 처리할 준비를 합니다. Listener는 특정 IP와 포트에 바인딩되어 들어오는 요청을 수신하고, 트래픽을 처리하기 위한 첫 번째 진입점입니다.

작동 위치: 네트워크에서 Envoy 프록시가 요청을 가로채고, 트래픽의 방향을 결정하기 위해 필터 체인을 적용합니다.

예시: HTTP 요청이 들어오면 Listener는 이를 처리할 라우팅 규칙을 찾습니다.

2. Route
역할: Listener에서 수신된 요청을 분석하여 어떤 서비스로 전달할지 결정합니다. Route는 요청 경로와 매칭되는 규칙을 기반으로 클러스터를 선택합니다.

작동 위치: Listener에서 필터 체인을 통해 전달된 요청은 Route에서 적절한 클러스터로 연결됩니다.

예시: 특정 URL 경로(/api/v1)에 대한 요청을 특정 클러스터로 라우팅.

3. Cluster
역할: 라우팅된 요청을 처리할 논리적인 서비스 그룹입니다. Cluster는 여러 Endpoint(IP와 포트)로 구성되며, Envoy가 외부 서비스와 연결하는 단위입니다.

작동 위치: Route가 선택한 클러스터는 실제 엔드포인트로 트래픽을 포워드합니다.

예시: service-cluster라는 클러스터가 외부 API 서버를 대표하며, 해당 클러스터의 엔드포인트로 트래픽을 전달.

4. Endpoint
역할: 클러스터 내에서 실제 요청이 전달되는 대상입니다. Endpoint는 IP 주소와 포트를 포함하며, 클라이언트의 요청이 최종적으로 도달하는 곳입니다.

작동 위치: Cluster에서 선택된 엔드포인트로 트래픽이 전달됩니다.

예시: 특정 API 서버의 IP 주소(예: 192.168.1.100)와 포트(예: 8080)이 Endpoint로 설정됩니다.

네트워크 흐름 순서 요약
단계    구성 요소    역할 및 작업
1    Listener    요청 수신 및 필터 체인을 통해 초기 처리
2    Route    요청 경로 분석 및 적절한 클러스터 선택
3    Cluster    논리적 서비스 그룹으로 요청 전달
4    Endpoint    실제 대상(IP/포트)으로 최종 트래픽 전달
이 순서는 Istio 프록시의 기본적인 트래픽 처리 흐름이며, 각 단계는 Envoy 내부의 설정과 xDS API를 통해 동적으로 구성됩니다.
의도적으로 ingress, gateway, VirtualService 설정중 한곳에 문제를 주고 해당 서비스가 어떤 문제가 있는지 한번 위 명령어들로 확인해보고자 한다.
먼저 문제있는 서비스의 Ingress와 gateway, Virtual Service 설정은 다음과 같이 진행했다.
$ k get ingress -n istio-system | grep query
query-ingress   alb     query.test.com                                                        query-server-ingress-fin.lb.naverncp.com    80      107d
위와같이 query-ingress는 현재 NCP ALB로 연결 된 상태다.
apiVersion: networking.k8s.io/v1
kind: Ingress
metadata:
  annotations:
중략
  labels:
    app: query-server-ingress
  name: query-server-ingress
  namespace: istio-system
spec:
  ingressClassName: alb
  defaultBackend:
    service:
      name: istio-ingressgateway
      port:
        number: 80
  rules:
  - host: query-test.com
    http:
      paths:
      - path: /
        pathType: Prefix
        backend:
          service:
            name: ssl-redirect
            port:
              name: use-annotation
GW와 VS 매니페스트는 다음과 같다.
apiVersion: networking.istio.io/v1beta1
kind: Gateway
metadata:
annotations:
kubectl.kubernetes.io/last-applied-configuration: |
중략
creationTimestamp: "2024-12-13T01:46:08Z"
generation: 1
labels:
app.kubernetes.io/instance: opsquery
name: query-gateway
namespace: istio-system
resourceVersion: "441696723"
uid: 19fc1bd0-5c30-4dc1-b624-b956da859c15
spec:
selector:
istio: ingressgateway
servers:
- hosts:
- query.test.co.kr
port:
name: http
number: 80
protocol: HTTP
---
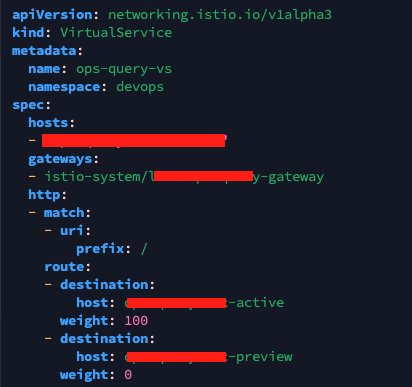
apiVersion: networking.istio.io/v1alpha3
kind: VirtualService
metadata:
name: ops-query-vs
namespace: devops
spec:
hosts:
- "ops-query.test.co.kr"
gateways:
- istio-system/devops-gateway
http:
- match:
- uri:
prefix: /
route:
- destination:
host: query-svc-active
weight: 100
- destination:
host: query-svc-preview
weight: 0이제 proxy-status와 proxy-config 명령어로 한번 원인을 찾아보고자 한다.
$ istioctl proxy-status | grep ops-query
ops-query-7cc7fc6f69-b6sml.devops                                    Kubernetes     SYNCED     SYNCED     SYNCED     SYNCED     NOT SENT     istiod-784bcfdd5d-2fgbs     1.16.2

$ istioctl proxy-config all ops-query-7cc7fc6f69-b6sml.devops | grep ops
##결과 없음
결과가 없다는건 Gateway나 VirtualService에 문제가 있을 가능성이 크다(고한다.)
Gateway 설정 문제:
Gateway가 Istio IngressGateway Pod와 제대로 연결되지 않았을 수 있습니다.
Gateway의 selector가 IngressGateway Pod의 라벨과 일치하지 않으면 트래픽을 수신할 Listener가 생성되지 않습니다.

VirtualService 설정 누락 또는 연결 문제:
VirtualService가 Gateway와 연계되어 있지 않거나, VirtualService에서 트래픽 라우팅 규칙이 제대로 정의되지 않았을 경우 Listener가 생성되지 않습니다.
VirtualService가 없으면 Gateway는 트래픽 처리 규칙을 알 수 없어 Listener를 생성하지 않습니다.

Istiod 구성 전달 문제:
Istiod(Control Plane)에서 Envoy 프록시(데이터 플레인)로 Gateway 및 VirtualService 설정이 전달되지 않았을 가능성이 있습니다.
이는 Istiod와 IngressGateway 간의 통신 문제, 혹은 설정 동기화 실패(STALE 상태)가 원인일 수 있습니다.
그럼 Ingress, GW, VS설정에 문제가 없는지 찾아보면 될것이다. 사실 VS 설정중 게이트웨이 설정하는부분을 잘못 넣어놨었다.
gateways:
-   istio-system/devops-gateway
정상적으로 하려면 devops-gateway가 아니라 query-gateway 으로 설정해줘야 한다.
$ istioctl proxy-config all ops-query-7cc7fc6f69-b6sml.devops  | grep ops-query
ops-query-svc-active.devops.svc.cluster.local                                  80        -          outbound      EDS
ops-query-svc-preview.devops.svc.cluster.local                                 80        -          outbound      EDS
80                                                                                   ops-query-svc-active, ops-query-svc-active.devops + 1 more...                                                            /*
80                                                                                   ops-query-svc-preview, ops-query-svc-preview.devops + 1 more...                                                          /*
서비스도 정상적으로 동작하고, proxy-config 의 결과에도 정상적으로 출력되는것이 확인된다.
proxy-config에 대한(리스너, 라우드, 클러스터, 엔드포인트등 xDS)자세한 설명은 다음 주차때 envoy프록시 설명에서 자세히 다룰듯 하다.
다시 실습으로 넘어가서...
# istio-ingressgateway 서비스 NodePort 변경 및 nodeport 30000로 지정 변경
kubectl get svc,ep -n istio-system istio-ingressgateway
kubectl patch svc -n istio-system istio-ingressgateway -p '{"spec": {"type": "NodePort", "ports": [{"port": 80, "targetPort": 8080, "nodePort": 30000}]}}'
kubectl get svc -n istio-system istio-ingressgateway
# istio-ingressgateway 서비스 externalTrafficPolicy 설정 : ClientIP 수집 확인
kubectl patch svc -n istio-system istio-ingressgateway -p '{"spec":{"externalTrafficPolicy": "Local"}}'
kubectl describe svc -n istio-system istio-ingressgateway
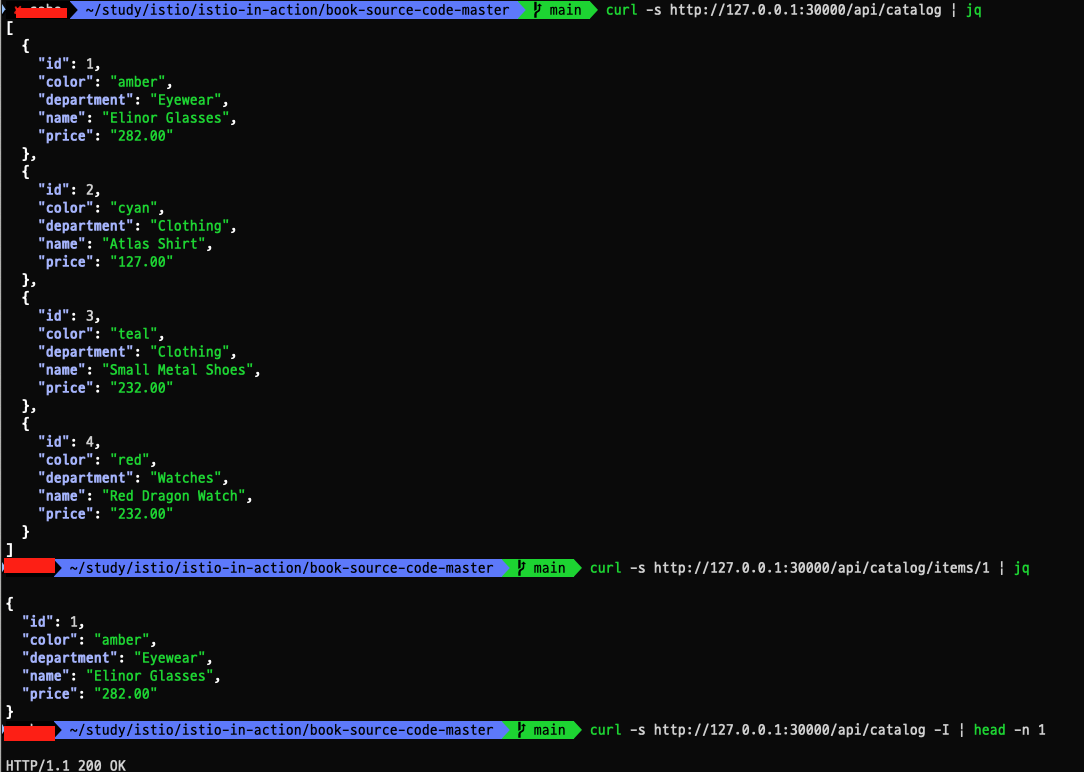
curl -s http://127.0.0.1:30000/api/catalog | jq
curl -s http://127.0.0.1:30000/api/catalog/items/1 | jq
curl -s http://127.0.0.1:30000/api/catalog -I | head -n 1위 명령어들로 실습환경의 30000포트로 접속가능하도록 설정해주고 curl로 접속을 확인하면 다음과 같이 정상적으로 접속됨을 확인 할 수 있다.
옵저버빌리티
이제 옵저버빌리티를 하기 위해 추가 설치한 프로메테우스, 그라파나, 키알리, 트레이싱에 대한 노드포트를 설정해준다.
kubectl patch svc -n istio-system prometheus -p '{"spec": {"type": "NodePort", "ports": [{"port": 9090, "targetPort": 9090, "nodePort": 30001}]}}'
kubectl patch svc -n istio-system grafana -p '{"spec": {"type": "NodePort", "ports": [{"port": 3000, "targetPort": 3000, "nodePort": 30002}]}}'
kubectl patch svc -n istio-system kiali -p '{"spec": {"type": "NodePort", "ports": [{"port": 20001, "targetPort": 20001, "nodePort": 30003}]}}'
kubectl patch svc -n istio-system tracing -p '{"spec": {"type": "NodePort", "ports": [{"port": 80, "targetPort": 16686, "nodePort": 30004}]}}'
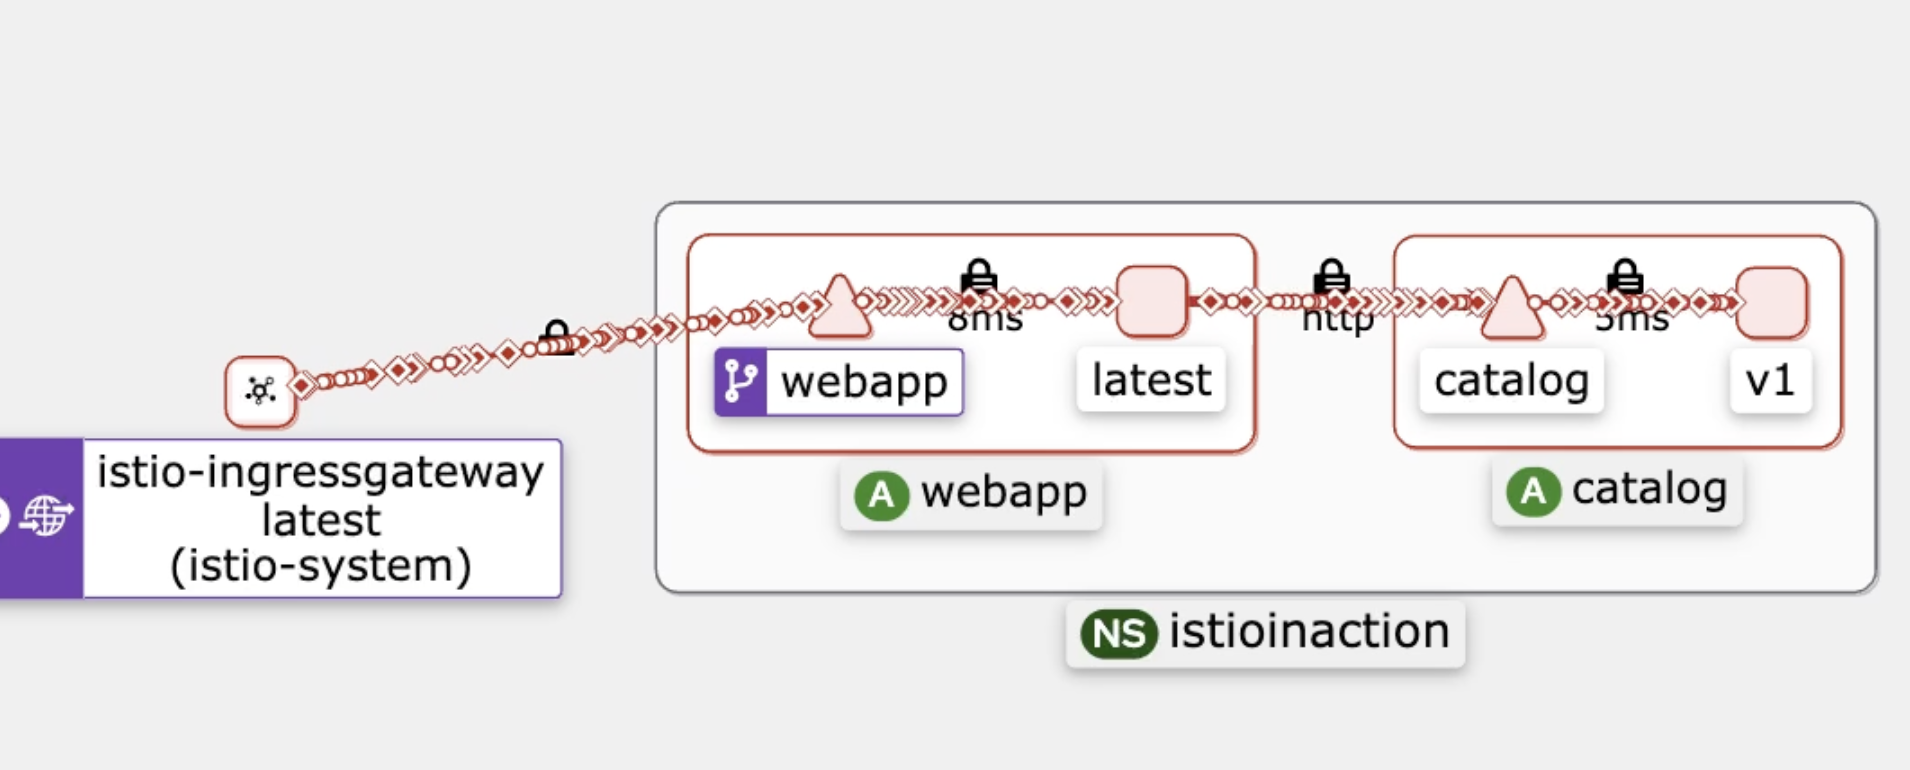
이후 localhost:서비스포트 로 접속하면 정상적으로 접속됨을 확인할 수 있다. 이중 Kiali를 살펴보면..
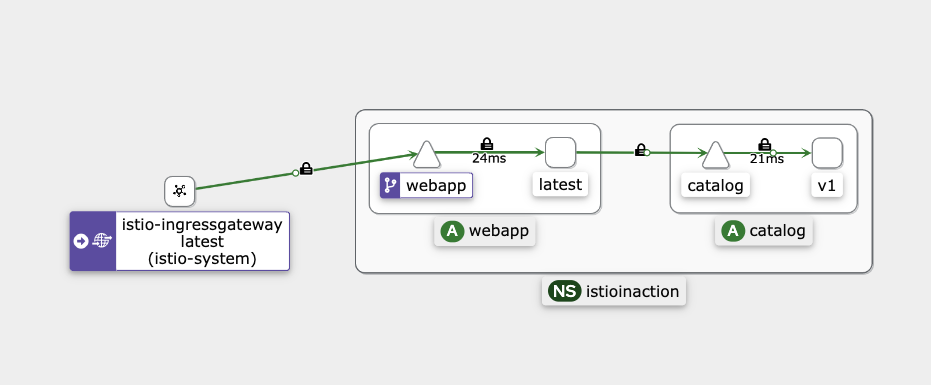
이미지와 같이 서비스매쉬의 트래픽 흐름을 확인 할 수 있다. 아까 장애 상황에서 라면 istio-ingressgateway에서 webapp으로 흐르는 트래픽이 안나왔을것이다.
이제 해당 서비스에 강제로 500에러를 50프로 빈도로 발생하도록 하면 kiali에서 다음 화면 처럼 실패가 나고 있는것을 볼 수 있다.
실무환경에서도 여러가지 이유로 간헐적으로 5xx대 에러가 발생할 수 있는데, 이때 다음 설정으로 5xx에러 발생시 재시도를 하도록 조치 할 수 있다.
cat <<EOF | kubectl -n istioinaction apply -f -
apiVersion: networking.istio.io/v1alpha3
kind: VirtualService
metadata:
  name: catalog
spec:
  hosts:
  - catalog
  http:
  - route:
    - destination:
        host: catalog
    retries:
      attempts: 3
      retryOn: 5xx
      perTryTimeout: 2s
EOF
위 설정은 만약 5xx대 에러 발생시 2초 뒤 3번 재시도 하도록 할 수 있다. 사이드카 방식 istio의 큰 장점이라고 본다.
이밖에, istio 만으로 트래픽을 컨트롤하여 여러가지 배포방법을 이용할 수 있다.
우리는 argocd를 사용중인데, VS에서 route 설정으로 weight으로 active, preview를 설정하여 블루/그린 배포방법을 이용중이다.
추가로 다음과같이 VS에 헤더를 기반으로 매칭을 확인하여 트래픽을 보낼 수 있다.
cat <<EOF | kubectl -n istioinaction apply -f -
apiVersion: networking.istio.io/v1alpha3
kind: VirtualService
metadata:
  name: catalog
spec:
  hosts:
  - catalog
  http:
  - match:
    - headers:
        x-dark-launch:
          exact: "v2"
    route:
    - destination:
        host: catalog
        subset: version-v2
  - route:
    - destination:
        host: catalog
        subset: version-v1
EOF
현재 운영환경에서 아르고 롤아웃으로 프리뷰가 배포 됐을 때, promote 하기 전에 해당 배포버전으로 미리 접속하여 QA를 진행하고자 할 수 있다. 이때 굉장히 유용할듯 하다.
마지막으로...
istio를 사용하면서 istio 컨테이너의 로그를 자세히 봐야 할 필요가 있었다.
실사례로, 프론트에서는 아무런 값이 안들어왔고, 백앤드에서는 데이터를 정상적으로 전송했다고 한다. 이때 istio 컨테이너 로그를 확인 할 필요가 있었다. 왜냐하면 결국 데이터가 전송됐다면 istio 로그에 찍혔을테니까 말이다.
그래서 다음과같은 설정을 적용해서 로그를 찍었다.
apiVersion: networking.istio.io/v1alpha3
kind: EnvoyFilter
metadata:
  name: request-size-limit
  namespace: test
spec:
  workloadSelector:
    labels:
      app: test-api
  configPatches:
  - applyTo: HTTP_FILTER
    match:
      context: ANY
      listener:
        filterChain:
          filter:
            name: envoy.filters.network.http_connection_manager
            subFilter:
              name: envoy.filters.http.router
    patch:
      operation: INSERT_BEFORE
      value:
        name: envoy.filters.http.buffer
        typed_config:
          "@type": type.googleapis.com/envoy.extensions.filters.http.buffer.v3.Buffer
          max_request_bytes: 50485760


  - applyTo: HTTP_FILTER
    match:
      context: ANY
      listener:
        filterChain:
          filter:
            name: envoy.filters.network.http_connection_manager
            subFilter:
              name: envoy.filters.http.router
    patch:
      operation: INSERT_BEFORE
      value:
        name: envoy.filters.http.lua
        typed_config:
          "@type": type.googleapis.com/envoy.extensions.filters.http.lua.v3.Lua
          inlineCode: |
            function envoy_on_response(response_handle)
              local headers = response_handle:headers()
              for key, value in pairs(headers) do
                response_handle:logInfo("response Header:" .. key .. ":"  .. value)
              end
              local response_body = response_handle:body():getBytes(0,response_handle:body():length())
              response_handle:logInfo("response body:" .. response_body)
            end

  - applyTo: LISTENER
    match:
      context: ANY
    patch:
      operation: MERGE
      value:
        per_connection_buffer_limit_bytes: 20480000
해당 설정은 요청에 대한 response body 용량과 실제 body 내용을 로그로 남기는 설정이다.
마무리..
1주차부터 좋은 지식을 많이 얻었다. 스터디 운영진님들 감사합니다.
'job > devops' 카테고리의 다른 글
| taskfile (0) | 2024.03.10 |
|---|---|
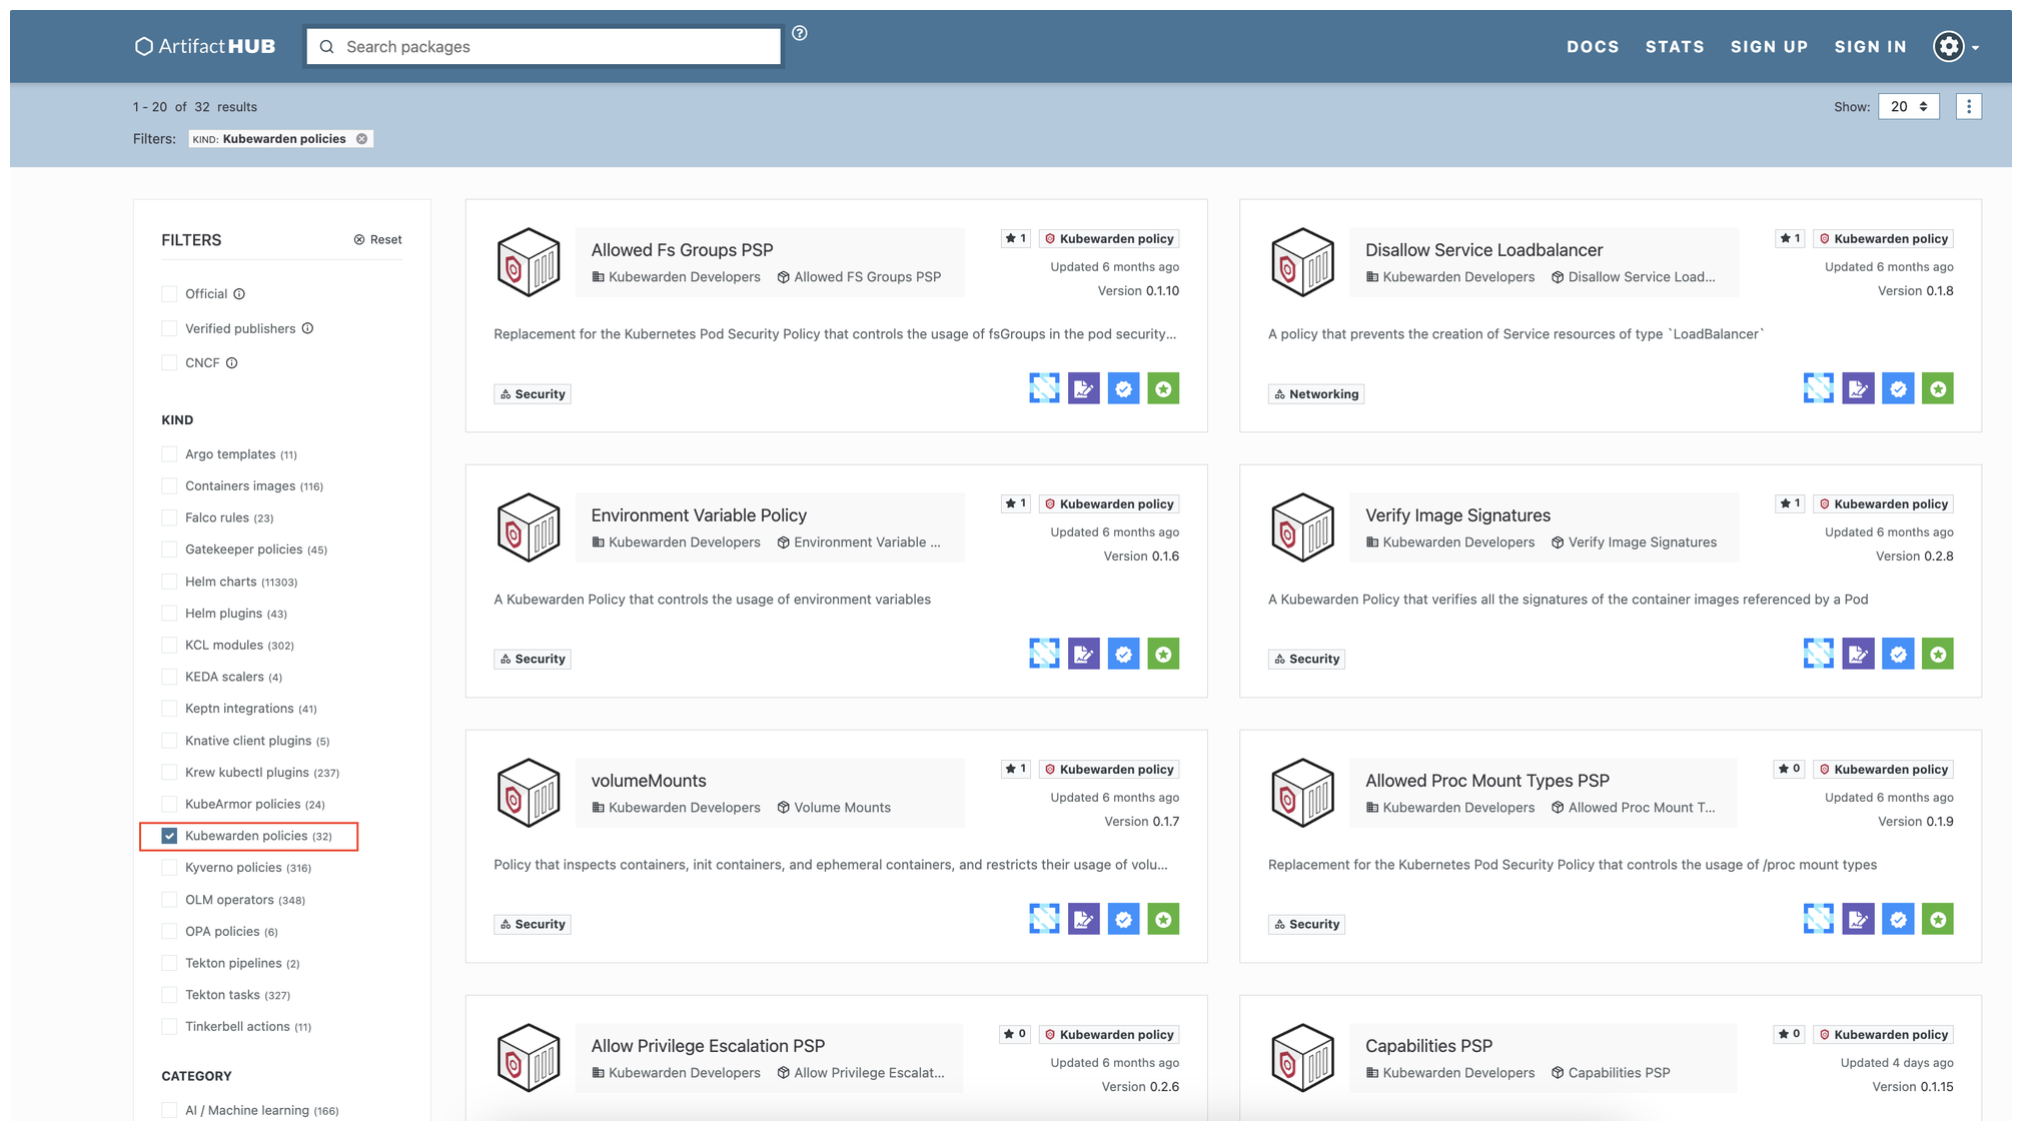
| kubewarden (0) | 2024.01.20 |
| openfunction (0) | 2023.12.01 |
| git common flow(또는 gitlab flow) 브랜치 전략에 대한 설명 (0) | 2023.06.13 |

